1. Fold an A4 sheet of paper in half, horizontally and cut into two long strips. Tape the strips together with a 1 inch overlap to make a long strip like in the photo below. This is for the headband. Before you stick it, measure the strip around your head and make sure it will fit your head. If it doesn’t fit cut out another strip from another piece of paper and measure and trim until it fits around your head. Keep aside for later – don’t glue together yet!
1
2. From two sheets of A4 paper cut two 21cm x 21cm squares and tape one side together.
3. Fold in half so you have one square shape. Then, 9.5cm in from the bottom end, draw a line to the top left corner, then cut out the triangle as in picture 3 below
2
3
4
4. Open out the shape and glue it to the correct size headband strip you made before in step 1. Placing it in the middle from the bottom of the headband. See picture 4 above.
5. Loosely tape the headband together at the back. It should look like the pictures below. This is the base of your hat where everything will get glued to. It is easier to work with it while it is round. You will need to open it flat later to add the waves so don’t use glue or lots of tape at this stage!
5A
5B
Step 2 - Making the ship
1. The sides of the ship.
Cut two 8cm wide strips horizontally from an A4 sheet of paper and tape together. Draw the windows and the name “EMPIRE WINDRUSH” LONDON as in the picture below.
1
2. The mast of the ship
Fold another A4 sheet of paper in half and draw a 6cm x 7cm rectangle at the bottom of the page as in picture 1 below and add a tab on the side. From the top draw half of the mast on the fold, then cut it out keeping the paper folded as in picture 1 below. When you open it out it will look like picture 2. Fold the tabs back as you can see in picture 2.
1
2
3. Putting the ship together
1. Fold a new A4 sheet of paper in half and draw a curved shape with tabs around it, as in picture A &B. Picture B shows you what size this shape should be.
2. Cut it out keeping the paper folded.
3. Open it out and fold the tabs up as in picture 3.
1A
1B
2
3A
3B
4. Glue the tabs of the curved shape from the top, to the back of the windows on the sides of your ship piece making sure it is centre and 2cm lower from the top (see pictures 4 & 5 above). Remember to make sure your ship windows are on the opposite side.
5. Continue to glue the tabs to the sides of the ship to form the curve of the ship see below.
4
5
4. Adding the mast
Place the bottom of the mast in line with the bottom of the sides of the ship and glue the mast to the tabs on the inside of the curved shape at the top, then stick the tabs of the mast to the sides of the ship.
1
2
Step 3 - Making the people
1. On a strip of paper 20cm long x 4.5cm high draw and then cut out a line of people – make sure to leave a gap of 2cm at the bottom for gluing them to the ship. You can make these as detailed as you can. The people who came on the Empire Windrush ship were from the Caribbean and they were Nurses, Crafts men, Soldiers, Musicians so you can add hats and musical instruments especially the Steelpan. Be creative, you can colour them in if you like.
2. Glue your people to the inside front of the Ship using the 2cm gap at the bottom of your people. Make sure your people are facing outwards and standing above the windows and in front of the mast, as in the pictures below.
1
2A
2B
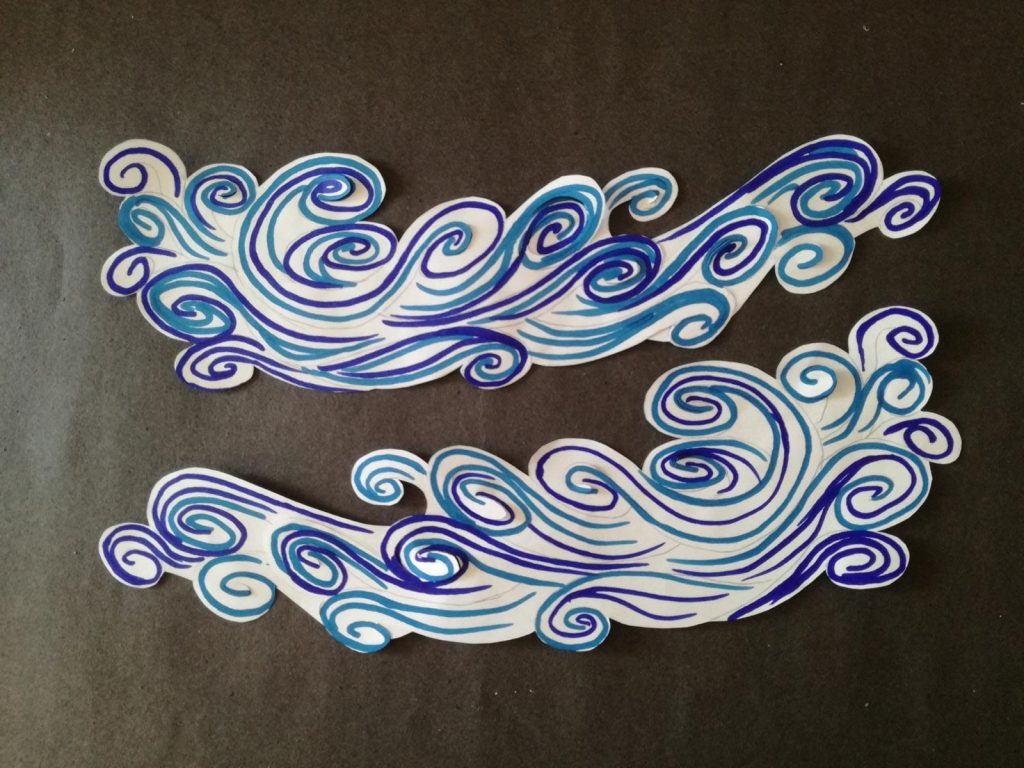
Step 4 – Making the sea
Draw, colour and cut different shapes and sizes of waves – you can have lots of fun with these. Make 4 big shapes 2 middle size shapes and several smaller shapes.
1
2
Step 5 - Joining everything together
1. Glue the ship to the top centre of the hat base you made earlier as in pictures 1A&B below.
2. To decorate the sides of the ship, glue the 2 smaller shapes to the bottom of the ship at the front below the windows then place 1 big shape to either side, at the top – see picture 2 below
1A
1B
2
3. Undo the tape at the back of your headband, and open it up. Spread the hat flat as in picture 1 below and place the 2nd big wave shape at the bottom of the hat base. Do not glue the shapes to the head band yet!
4. Trim the white bits in between the waves to make a space for your face. See picture 2 below – all the white bits showing under the waves in the first picture have been removed in the second picture.
5. Turn the hat base sides around and glue the head band together securely now as in picture 3.
1
2
3
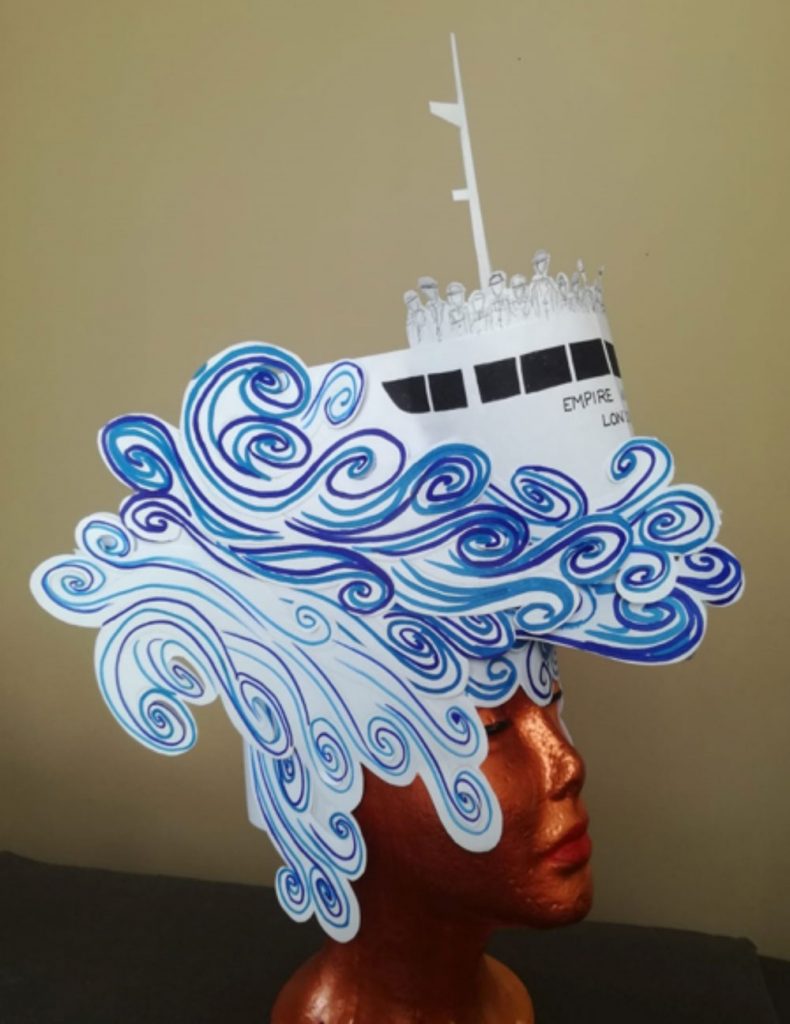
Well done !!!! This is how it will look from the side and from the front.
You can add glitter and more waves. Have fun with your Empire Windrush ship headdress.
We would love to see your fantastic creations so please share your pictures with us on social media @mahoganycarnival.
Thank you for using our template. We hope you enjoyed making your hat and we look forward to seeing you on our next creative making carnival workshop.